Choosing the Right Pot Size for Your Alocasia: A Complete Guide

Selecting the right pot size for your Alocasia is a crucial step in ensuring its healthy growth and development. Alocasias, with their dramatic foliage and robust root systems, thrive when given adequate space while maintaining proper soil moisture levels. This guide will help you understand how pot size impacts your Alocasia’s health, how to choose the perfect size, and tips for repotting your plant effectively.


Why Pot Size Matters for Alocasia

1. Root Health

  • The size of the pot directly influences the health of your Alocasia’s roots. Too small, and the roots become cramped and stressed; too large, and excess soil can retain water, leading to root rot.

2. Soil Moisture Balance

  • A correctly sized pot ensures that the soil dries out evenly, preventing issues like overwatering or underwatering.

3. Stability

  • Alocasia plants, especially larger varieties, need a pot size that provides stability to support their top-heavy foliage.

4. Growth Potential

  • The right pot size gives your Alocasia enough room to grow and flourish without frequent repotting, which can stress the plant.

Factors to Consider When Choosing a Pot Size

1. Current Root System

  • Examine the plant’s roots to determine its current size.
  • If the roots are circling the inside of the pot (root-bound), it’s time to size up.

2. Plant Size

  • The pot should be proportional to the size of the plant. A pot that’s too small won’t support the plant’s height and weight, while an oversized pot can lead to water retention.

3. Type of Alocasia

  • Compact varieties like Alocasia Polly require smaller pots, whereas larger species like Alocasia Macrorrhiza need more room to grow.

4. Growth Stage

  • Younger plants require smaller pots, while mature Alocasias may need larger containers to accommodate their expansive root systems.

How to Choose the Right Pot Size

1. Size Up Gradually

  • When repotting, choose a pot that’s 1-2 inches larger in diameter than the current one.
  • For example: If your Alocasia is in a 6-inch pot, move up to an 8-inch pot.

2. Depth and Drainage

  • Opt for a pot that’s deep enough to support the root system but not excessively large.
  • Ensure the pot has drainage holes to prevent waterlogging.

3. Material Matters

  • Terracotta Pots: Ideal for Alocasias as they absorb excess moisture and allow the soil to dry evenly.
  • Plastic Pots: Retain more moisture, which can be suitable for dry environments but requires careful watering.
  • Ceramic Pots: Attractive but ensure they have drainage holes for proper water management.

Signs Your Alocasia Needs a Bigger Pot

1. Roots Emerging from Drainage Holes

  • Indicates the plant is root-bound and needs more space.

2. Slow Growth or Stunted Leaves

  • Lack of room for root expansion can hinder the plant’s overall growth.

3. Frequent Drying of Soil

  • If the soil dries out too quickly after watering, the roots may be overcrowded.

4. Top-Heavy Plant

  • If the plant becomes unstable and tips over easily, it’s a sign that the pot is too small to support its size.

Tips for Repotting Your Alocasia

1. Timing

  • Repot during the growing season (spring or early summer) when the plant is actively producing new growth.
  • Avoid repotting during dormancy, as this can stress the plant.

2. Prepare the New Pot

  • Choose a pot 1-2 inches larger in diameter than the current one.
  • Fill the bottom with a layer of fresh, well-draining soil mix.

3. Gently Remove the Plant

  • Carefully remove the Alocasia from its current pot, supporting the base to avoid damaging the roots.
  • Loosen any compacted roots and trim away any that are damaged or rotting.

4. Position and Fill

  • Place the plant in the center of the new pot, ensuring the top of the root ball sits about an inch below the rim.
  • Fill around the root ball with fresh soil, gently pressing it down to eliminate air pockets.

5. Water Thoroughly

  • Water the plant well after repotting to help the soil settle. Allow excess water to drain completely.

Common Mistakes to Avoid

1. Using an Oversized Pot

  • Large pots retain too much water, increasing the risk of root rot. Always size up gradually.

2. Ignoring Drainage

  • A pot without drainage holes traps water, leading to soggy soil and unhealthy roots.

3. Overwatering After Repotting

  • Alocasias are sensitive to overwatering, especially after repotting. Allow the soil to dry slightly before the next watering.

4. Repotting Too Often

  • Repot only when necessary (every 1-2 years) to avoid unnecessary stress on the plant.

FAQs About Pot Size for Alocasia

Q: How do I know when my Alocasia needs repotting?

  • Look for roots growing out of drainage holes, slow growth, or soil that dries too quickly after watering.

Q: Can I plant my Alocasia in a decorative pot without drainage?

  • It’s not recommended, but if you do, use it as a cachepot and place the Alocasia in a plastic pot with drainage inside the decorative pot.

Q: How often should I repot my Alocasia?

  • Typically every 1-2 years or when the plant outgrows its pot.

Q: Can I use a self-watering pot for Alocasia?

  • Self-watering pots can work but require careful monitoring to avoid overwatering.

Conclusion

Choosing the right pot size is essential for the health and growth of your Alocasia. By selecting a pot that supports the plant’s root system, provides stability, and ensures proper drainage, you’ll create an ideal environment for your Alocasia to thrive. Pair this with consistent care, and your Alocasia will reward you with its stunning, vibrant foliage.

Take the time to find the perfect pot, and enjoy the beauty of a well-cared-for Alocasia in your home or garden!
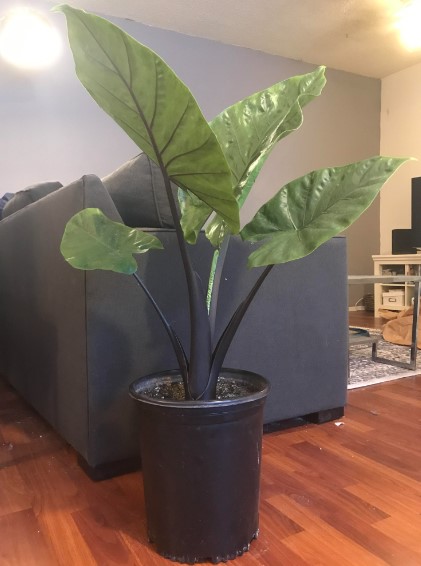
The Yellow Tail Alocasia: A Stunning Variety to Add to Your Collection

The Yellow Tail Alocasia is a rare and captivating addition to any plant collector’s portfolio. With its unique yellow-tinted stems and striking green foliage, this exotic beauty is a true standout among Alocasia varieties. Highly sought after for its aesthetic appeal and rarity, the Yellow Tail Alocasia requires specific care to thrive. In this guide, we’ll explore the features that make it special and provide essential tips to help you nurture this stunning plant.


What Makes the Yellow Tail Alocasia Unique?

1. Distinctive Yellow Stems

  • The plant gets its name from its vibrant yellow stems, which contrast beautifully with its deep green, arrow-shaped leaves.
  • This bold color combination makes it an eye-catching addition to any indoor or outdoor garden.

2. Striking Foliage

  • The large, glossy leaves with prominent venation add an architectural elegance to the plant.
  • The slightly wavy edges of the leaves create a dynamic, tropical look.

3. Rare and Exotic

  • As a less common variety, the Yellow Tail Alocasia is a prized find for collectors, making it a conversation starter in any plant collection.

4. Moderate Size

  • Typically grows up to 2-4 feet tall, making it suitable for both tabletop displays and floor placements in larger spaces.

Ideal Growing Conditions

1. Light Requirements

  • Optimal: Bright, indirect sunlight to maintain its vibrant yellow stems and lush foliage.
  • Avoid: Direct sunlight, which can scorch the leaves, and low-light conditions, which may dull its colors.
  • Tip: Position near an east- or north-facing window, or use a sheer curtain to filter strong light.

2. Temperature Preferences

  • Ideal Range: Between 18–30°C (65–85°F).
  • Protect it from temperatures below 15°C (59°F) and sudden temperature changes.

3. Humidity Needs

  • Thrives in high humidity levels above 60%, reflecting its tropical origins.
  • How to Increase Humidity:
    • Use a humidifier in dry climates.
    • Place the plant on a pebble tray with water or group it with other tropical plants to boost humidity naturally.

4. Soil and Potting

  • Soil Mix: A well-draining, aerated mix is essential. Combine peat moss, perlite, and orchid bark for optimal results.
  • Drainage: Ensure the pot has drainage holes to prevent waterlogging and root rot.

Watering Guidelines

1. Maintain Moisture

  • Water when the top inch of soil feels dry, keeping the soil evenly moist but never soggy.
  • Yellow Tail Alocasia is highly sensitive to overwatering, so always check soil moisture before watering.

2. Seasonal Adjustments

  • Reduce watering during the winter months when the plant’s growth slows.

3. Use Distilled Water

  • This plant prefers distilled or rainwater, as tap water may contain minerals that can harm its roots and leaves.

Fertilization Tips

  • During Growing Season: Feed every 4-6 weeks in spring and summer with a diluted, balanced liquid fertilizer to support vibrant growth.
  • Dormancy: Stop fertilizing in winter when the plant is not actively growing.

Pruning and Maintenance

1. Remove Damaged Leaves

  • Trim yellowing, browning, or damaged leaves to encourage healthy growth.
  • Use clean, sterilized scissors to avoid introducing infections.

2. Clean the Leaves

  • Wipe the leaves gently with a damp cloth to remove dust and enhance their glossy appearance.

3. Repot as Needed

  • Repot every 1-2 years or when the plant becomes root-bound. Use a pot that is 1-2 inches larger in diameter than the current one.

Common Problems and Solutions

Problem Cause Solution
Yellowing Leaves Overwatering or poor drainage. Adjust watering schedule; ensure proper drainage.
Brown Leaf Edges Low humidity or underwatering. Increase humidity and water consistently.
Drooping Leaves Stress from environmental changes. Maintain stable light, water, and humidity conditions.
Pests (e.g., spider mites, mealybugs) Dry conditions or lack of inspection. Treat with neem oil or insecticidal soap; inspect regularly.

Propagation of Yellow Tail Alocasia

1. Rhizome Division

  • The most effective way to propagate Yellow Tail Alocasia is by dividing its rhizomes during repotting.
  • Ensure each division has a healthy root system and at least one leaf or bud.

2. Timing

  • Propagate during spring or early summer when the plant is actively growing.

Displaying Your Yellow Tail Alocasia

1. Indoor Decor

  • Use it as a centerpiece in living rooms, offices, or entryways to highlight its unique yellow stems.
  • Pair it with neutral or bold pots to complement its vibrant colors.

2. Tropical Garden Feature

  • Incorporate it into outdoor tropical-themed gardens in warmer climates, placing it in partial shade for the best results.

3. Patio or Balcony Charm

  • Grow it in a decorative container to enhance patios or balconies. Protect it from strong wind and direct sunlight.

FAQs About Yellow Tail Alocasia

Q: Is Yellow Tail Alocasia toxic to pets?

  • Yes, it is toxic to pets and humans if ingested. Keep it out of reach of children and animals.

Q: Why are my Yellow Tail Alocasia’s leaves curling?

  • Curling leaves can indicate low humidity, underwatering, or sudden environmental changes. Increase humidity and water consistently.

Q: Can Yellow Tail Alocasia be grown outdoors?

  • Yes, in warm, humid climates. In cooler regions, it’s best grown indoors or in a greenhouse.

Q: How fast does Yellow Tail Alocasia grow?

  • Growth depends on care conditions. With proper light, water, and humidity, it can produce new leaves every few weeks during the growing season.

Tips for Success

  1. Monitor Light Levels: Place the plant in bright, indirect sunlight and rotate it occasionally for even growth.
  2. Maintain Humidity: Use a humidifier or mist the plant regularly, especially in dry indoor environments.
  3. Inspect Regularly: Check for pests or signs of stress and address issues promptly.
  4. Be Patient: Yellow Tail Alocasia may take time to adjust to new environments but will reward consistent care with stunning growth.

Conclusion

The Yellow Tail Alocasia is a rare and stunning tropical plant that adds vibrant color and exotic beauty to any space. While it requires specific care, its bold yellow stems and glossy green leaves make it a rewarding addition to your collection. By following the tips in this guide, you’ll enjoy a thriving, healthy Yellow Tail Alocasia that will be the envy of plant enthusiasts everywhere.

Add this unique variety to your collection today and elevate your indoor or outdoor garden with its striking appeal!

Alocasia Stingray in NZ: Tips for Successful Growth

The Alocasia Stingray, with its unique, stingray-shaped leaves and striking appearance, is a tropical beauty that has gained popularity among plant lovers in New Zealand. While this plant thrives in warm, humid climates, adapting its care to New Zealand’s environment ensures its successful growth. This guide provides localized care tips tailored to the NZ climate, helping you nurture a lush and healthy Alocasia Stingray.


Why Choose Alocasia Stingray?

1. Distinctive Appearance

  • The plant’s paddle-shaped leaves feature a pointed tip resembling a stingray’s tail, making it a standout addition to any collection.

2. Compact Size

  • Typically grows up to 1-2 meters tall, making it suitable for both indoor and outdoor spaces.

3. Versatile Placement

  • Perfect as an indoor plant in colder regions or as part of a tropical garden in warmer parts of New Zealand.

Understanding New Zealand’s Climate

New Zealand’s temperate climate varies from subtropical in the north to cooler temperatures in the south. Alocasia Stingray, native to tropical regions, requires careful attention to temperature, humidity, and light conditions to thrive.


Caring for Alocasia Stingray in NZ

1. Light Requirements

  • Optimal: Bright, indirect sunlight is ideal for healthy growth.
  • Avoid: Harsh, direct sunlight, which can scorch the leaves, especially in NZ’s high UV conditions.
  • Tip: Place it near an east-facing window indoors or in a shaded outdoor spot.

2. Temperature Preferences

  • Ideal Range: Between 18–30°C (65–85°F).
  • Protect the plant from frost and cold drafts, as temperatures below 15°C (59°F) can damage it.
  • Winter Care: In cooler regions, move the plant indoors or to a sheltered greenhouse during winter.

3. Humidity Needs

  • Alocasia Stingray thrives in high humidity levels above 50-60%.
  • How to Maintain Humidity:
    • Use a humidifier indoors.
    • Place the plant on a pebble tray with water.
    • Group it with other tropical plants to create a humid microclimate.

4. Soil and Potting

  • Use a well-draining, nutrient-rich potting mix. A blend of peat moss, perlite, and orchid bark works well.
  • Ensure the pot has drainage holes to prevent waterlogging, which can lead to root rot.

Watering Guidelines

1. Consistent Moisture

  • Keep the soil evenly moist but not soggy. Water when the top inch of soil feels dry.
  • Tip for NZ’s Rainy Seasons: Reduce watering if the plant is outdoors and exposed to frequent rainfall to avoid overwatering.

2. Seasonal Adjustments

  • During winter, reduce watering as the plant enters a semi-dormant phase.

3. Water Quality

  • Use rainwater or distilled water to avoid mineral buildup, which can harm the plant. NZ’s clean rainwater is particularly beneficial for Alocasia Stingray.

Fertilization Tips

  • Feed the plant every 4-6 weeks during the growing season (spring and summer) with a diluted liquid fertilizer.
  • Avoid fertilizing during winter dormancy to prevent salt buildup in the soil.

Dealing with NZ-Specific Challenges

1. Frost Protection

  • In regions prone to frost, bring the plant indoors or cover it with frost cloth.
  • Mulch outdoor plants to insulate the roots from cold temperatures.

2. High UV Levels

  • Protect the plant from NZ’s strong sunlight by providing shade cloth outdoors.
  • Indoors, use curtains or sheer blinds to filter sunlight.

3. Pests

  • Common pests in NZ include spider mites, mealybugs, and scale.
  • Solution: Inspect the plant regularly and treat infestations with neem oil or insecticidal soap.

Propagating Alocasia Stingray in NZ

1. Rhizome Division

  • The best way to propagate Alocasia Stingray is by dividing its rhizomes during repotting.
  • Ensure each division has healthy roots and at least one leaf or bud.

2. Optimal Time

  • Perform propagation in spring or early summer when the plant is actively growing.

Decorating with Alocasia Stingray in NZ

1. Indoor Impact

  • Use it as a statement piece in a well-lit living room or office. Its unique leaves add a touch of elegance to modern interiors.

2. Outdoor Tropical Gardens

  • Plant it in a shaded garden bed alongside ferns, philodendrons, and other tropical species to create a lush, layered look.

3. Patio or Balcony Feature

  • Grow it in a decorative pot to enhance patios or sheltered balconies, particularly in warmer regions.

FAQs About Alocasia Stingray in NZ

Q: Can Alocasia Stingray survive outdoors year-round in NZ?

  • In northern regions with milder winters, it can survive outdoors with proper frost protection. In colder regions, it’s best grown indoors or moved to a greenhouse during winter.

Q: How often should I water my Alocasia Stingray?

  • Water when the top inch of soil feels dry. Reduce watering during cooler months or in rainy seasons if the plant is outdoors.

Q: Why are my Stingray’s leaves curling?

  • Curling leaves can indicate low humidity, underwatering, or sudden environmental changes. Adjust care routines accordingly.

Q: Is Alocasia Stingray toxic to pets?

  • Yes, Alocasia Stingray is toxic to pets and humans if ingested. Keep it out of reach of children and animals.

Tips for Success

  1. Rotate Regularly: Turn the pot every few weeks to ensure even growth and prevent the plant from leaning toward the light.
  2. Inspect for Pests: Check the plant’s leaves regularly for signs of pests, especially if it’s grown outdoors.
  3. Repot When Necessary: Repot every 1-2 years or when the plant becomes root-bound.
  4. Be Patient: Alocasia Stingray may go dormant during winter, but it will bounce back with proper care in spring.

Conclusion

Growing an Alocasia Stingray in New Zealand can be a rewarding experience, especially when you adapt its care to local conditions. With its unique foliage and tropical allure, it’s a stunning addition to any home or garden. By following these tips, you’ll enjoy a thriving, healthy plant that turns heads and adds a touch of the exotic to your space.

Embrace the beauty of the Alocasia Stingray and transform your NZ garden or indoor collection into a tropical paradise!

Exploring the Alocasia Yucatan Queen: A Unique Addition to Your Garden


The Alocasia Yucatan Queen is a captivating tropical plant that stands out with its glossy, deep green leaves, dramatic veining, and robust growth habit. Its bold presence and exotic appeal make it a must-have for plant collectors and enthusiasts looking to elevate their indoor or outdoor gardens. In this guide, we’ll explore the unique features of the Alocasia Yucatan Queen, its care requirements, and tips for showcasing this stunning plant in your space.


What Makes Alocasia Yucatan Queen Unique?

1. Stunning Foliage

  • The plant’s large, paddle-shaped leaves have a glossy, dark green surface with prominent veining that adds texture and depth.
  • Its leaves can grow up to 2-3 feet long, creating a bold, tropical statement.

2. Impressive Size

  • The Yucatan Queen is a medium-to-large Alocasia variety, reaching heights of 4-6 feet in optimal conditions.

3. Exotic Origins

  • Native to tropical rainforests, this plant thrives in warm, humid environments, making it an excellent choice for creating a lush, jungle-inspired aesthetic.

4. Versatile Placement

  • Whether grown indoors as a statement plant or outdoors as part of a tropical garden, the Alocasia Yucatan Queen adapts beautifully to various settings.

Ideal Growing Conditions

1. Light Requirements

  • Optimal: Bright, indirect sunlight.
  • Avoid: Direct sunlight, which can scorch the leaves, and low-light conditions, which may hinder growth.
  • Tip: If growing outdoors, place it in a shaded or partially shaded spot to replicate its natural habitat.

2. Temperature Preferences

  • Ideal Range: Between 18–30°C (65–85°F).
  • Protect it from temperatures below 15°C (59°F), as it is highly sensitive to cold.

3. Humidity Needs

  • Prefers high humidity levels above 60%.
  • How to Increase Humidity:
    • Use a humidifier indoors.
    • Place the plant near water features or mist it regularly in drier climates.

4. Soil and Potting

  • Soil Mix: A well-draining mix that retains some moisture is ideal. Combine peat moss, perlite, and compost for optimal results.
  • Potting: If grown in a container, ensure the pot has adequate drainage holes to prevent waterlogging.

Watering Guidelines

1. Consistent Moisture

  • Water when the top inch of soil feels dry, keeping the soil evenly moist but not soggy.
  • Avoid letting the soil dry out completely, as this can stress the plant.

2. Seasonal Adjustments

  • Reduce watering during winter dormancy when growth slows.

3. Water Quality

  • Use distilled or rainwater to prevent mineral buildup, which can harm the roots and foliage.

Fertilization Tips

  • Growing Season: Feed every 4-6 weeks with a diluted, balanced liquid fertilizer during spring and summer.
  • Dormancy: Stop fertilizing during winter to allow the plant to rest.

Common Issues and Solutions

Problem Cause Solution
Yellowing Leaves Overwatering or poor drainage. Adjust watering; check for root rot.
Brown Leaf Tips Low humidity or underwatering. Increase humidity and water regularly.
Drooping Leaves Stress from environmental changes. Maintain stable light and temperature.
Pest Infestations Spider mites, aphids, or mealybugs. Treat with neem oil or insecticidal soap.

Showcasing Alocasia Yucatan Queen in Your Space

1. Indoor Elegance

  • Place it in a bright corner or near an east-facing window to maximize its aesthetic impact.
  • Use a large, decorative pot to elevate its presence and complement its bold foliage.

2. Outdoor Drama

  • Incorporate it into tropical-themed landscapes or use it as a centerpiece in garden beds.
  • Pair it with other tropical plants like calatheas, philodendrons, or ferns for a lush, layered effect.

3. Patio and Balcony Appeal

  • If grown in a container, the Alocasia Yucatan Queen adds a sophisticated touch to patios or balconies, especially in warm climates.

FAQs About Alocasia Yucatan Queen

Q: How often should I water my Yucatan Queen?

  • Water when the top inch of soil feels dry. Frequency may vary depending on temperature and humidity levels.

Q: Can I grow Alocasia Yucatan Queen outdoors year-round?

  • Only in tropical or subtropical climates. In colder regions, bring it indoors during fall and winter.

Q: Why are the leaves of my Alocasia curling?

  • Curling leaves may indicate low humidity, underwatering, or pest issues. Increase humidity, check watering practices, and inspect for pests.

Q: How do I propagate Alocasia Yucatan Queen?

  • Propagation is best done by dividing the rhizomes during repotting. Ensure each division has roots and at least one leaf.

Tips for Success

  1. Rotate Regularly: Turn the plant every few weeks to ensure even growth and prevent leaning toward the light source.
  2. Inspect for Pests: Check the undersides of leaves regularly for signs of pests and treat them promptly if detected.
  3. Repot When Needed: Repot every 1-2 years or when the plant outgrows its container.
  4. Clean the Leaves: Dust can accumulate on the glossy leaves, so wipe them gently with a damp cloth to maintain their shine and health.

Conclusion

The Alocasia Yucatan Queen is a stunning addition to any garden or indoor space, offering lush, dramatic foliage that brings a tropical vibe wherever it’s placed. While it requires specific care, its bold presence and unique aesthetic make it well worth the effort. By following the tips in this guide, you can enjoy a thriving, healthy Yucatan Queen that will captivate everyone who sees it.

Add the Alocasia Yucatan Queen to your collection today and transform your space into a tropical paradise!

Caring for Green Velvet Alocasia: Tips for a Lush Indoor Plant


The Green Velvet Alocasia (Alocasia Micholitziana) is a tropical beauty known for its dark green, velvety leaves with striking white veins. Its elegant appearance makes it a favorite among plant enthusiasts, but its care requirements can be a bit demanding. With proper attention to its specific needs, this stunning plant can thrive and become a centerpiece of your indoor garden. Here’s a comprehensive guide to keeping your Green Velvet Alocasia lush and healthy.


Key Features of Green Velvet Alocasia

1. Striking Foliage

  • Deep green leaves with a velvety texture and prominent, contrasting white veins.
  • Compact, upright growth habit, typically reaching 2-3 feet in height.

2. Tropical Origin

  • Native to Southeast Asia, this plant thrives in warm, humid environments that mimic its natural habitat.

3. Decorative Appeal

  • The plant’s unique foliage and manageable size make it perfect for enhancing living rooms, offices, or bedrooms.

Ideal Growing Conditions

1. Light Requirements

  • Optimal Light: Bright, indirect sunlight is best to maintain the vibrancy of its leaves.
  • Avoid: Direct sunlight, which can scorch the delicate foliage, and low-light conditions, which can stunt growth.
  • Tip: Place the plant near an east-facing window or filter strong sunlight through a sheer curtain.

2. Temperature Preferences

  • Ideal Range: Between 18–30°C (65–85°F).
  • Keep it away from cold drafts, air conditioning vents, or sudden temperature changes, which can stress the plant.

3. Humidity Needs

  • High Humidity: Above 60% is ideal for this tropical plant.
  • How to Increase Humidity:
    • Use a humidifier near the plant.
    • Place it on a pebble tray filled with water.
    • Group it with other tropical plants to create a humid microclimate.

4. Soil and Potting

  • Soil Mix: Use a well-draining, nutrient-rich mix. A blend of peat moss, perlite, and orchid bark works well.
  • Drainage: Ensure the pot has drainage holes to prevent waterlogging, which can lead to root rot.

Watering Guidelines

1. Consistent Moisture

  • Water when the top 1-2 inches of soil feel dry.
  • Keep the soil evenly moist but not soggy, as the plant is highly sensitive to overwatering.

2. Seasonal Adjustments

  • Reduce watering during winter dormancy, as the plant’s growth slows.

3. Water Quality

  • Use distilled or rainwater, as Green Velvet Alocasia is sensitive to minerals and salts found in tap water.

Fertilization Tips

  • Growing Season: Feed every 4-6 weeks during spring and summer with a diluted, balanced liquid fertilizer.
  • Dormancy: Stop fertilizing during winter to prevent salt buildup in the soil.

Pruning and Maintenance

1. Leaf Care

  • Remove yellowing, damaged, or dead leaves to encourage healthy growth.
  • Gently wipe the leaves with a damp cloth to remove dust and enhance their velvety texture.

2. Repotting

  • Repot every 1-2 years or when the plant becomes root-bound. Use a pot that is 1-2 inches larger in diameter than the current one.

Common Problems and Solutions

Issue Symptom Cause Solution
Yellowing Leaves Entire leaves turn yellow. Overwatering or poor drainage. Adjust watering schedule; ensure proper drainage.
Brown Leaf Edges Crispy edges on leaves. Low humidity or underwatering. Increase humidity and water regularly.
Drooping Leaves Leaves lose firmness and droop. Overwatering, underwatering, or stress. Check watering schedule; maintain consistent care.
Pest Infestations Visible pests like spider mites or mealybugs. Dry conditions or lack of inspection. Treat with neem oil or insecticidal soap.

Decorating with Green Velvet Alocasia

1. Focal Point

  • Use it as a centerpiece in a well-lit living room or office. Its bold foliage adds elegance and drama to any space.

2. Tropical Vibes

  • Pair it with other tropical plants like calatheas, philodendrons, or monsteras for a lush indoor garden.

3. Complementary Decor

  • Place it in a neutral or textured pot to highlight its rich green leaves and striking white veins.

FAQs About Green Velvet Alocasia Care

Q: How often should I water my Green Velvet Alocasia?

  • Water when the top inch of soil feels dry. Overwatering is a common issue, so always check the soil before watering.

Q: Why are my Alocasia’s leaves drooping?

  • Drooping leaves can result from overwatering, underwatering, or environmental stress. Evaluate the plant’s light, water, and humidity conditions.

Q: Can I propagate Green Velvet Alocasia?

  • Yes, propagation is done by dividing the rhizomes during repotting. Ensure each division has a healthy root system and at least one leaf.

Q: Does it require high humidity year-round?

  • While it prefers high humidity, it can adapt to moderate levels with proper care, such as occasional misting or using a pebble tray.

Tips for Success

  1. Rotate Regularly: Turn the pot every few weeks to ensure even growth and prevent the plant from leaning toward the light source.
  2. Monitor for Pests: Inspect the plant regularly for signs of pests, as dry indoor conditions can attract spider mites and other insects.
  3. Be Patient: Green Velvet Alocasia is sensitive to changes in its environment. Gradual adjustments to light, water, and humidity are best.

Conclusion

The Green Velvet Alocasia is a tropical treasure that adds elegance and sophistication to any indoor space. With its velvety leaves and striking white veins, it’s a must-have for plant lovers seeking a unique addition to their collection. While it requires specific care, the rewards of nurturing this beautiful plant are well worth the effort.

By following the tips in this guide, you can enjoy a lush, thriving Green Velvet Alocasia that will be the envy of your indoor garden!

Hilo Beauty Caladium vs. Alocasia: Which One Should You Choose?


The Hilo Beauty Caladium and Alocasia are two stunning tropical plants that often captivate plant enthusiasts with their bold, striking foliage. While they share similarities in appearance and origin, these plants have unique features, care requirements, and aesthetic appeals. This guide compares the Hilo Beauty Caladium and Alocasia to help you decide which one best suits your space and lifestyle.


Key Differences Between Hilo Beauty Caladium and Alocasia

Feature Hilo Beauty Caladium Alocasia
Foliage Appearance Mottled green and cream leaves resembling camouflage. Broad, sculptural leaves with bold veining and glossy texture.
Size Compact, grows up to 2-3 feet tall. Varies: compact varieties (1-2 feet) to large species (5+ feet).
Light Requirements Prefers bright, indirect light or partial shade. Thrives in bright, indirect sunlight; some tolerate partial shade.
Watering Needs Requires consistently moist soil. Moist but well-draining soil; avoid overwatering.
Temperature Tolerance Tolerates warmer climates; less cold-hardy. Requires warm temperatures; sensitive to cold drafts.
Maintenance Low-maintenance and forgiving. Requires more attention to light, humidity, and watering.
Toxicity Toxic to pets and humans if ingested. Toxic to pets and humans if ingested.

Hilo Beauty Caladium: Features and Benefits

1. Stunning Foliage

  • The Hilo Beauty’s leaves are uniquely patterned with shades of green and cream, resembling a camouflage effect.
  • Its foliage has a softer, matte finish compared to the glossy texture of Alocasia leaves.

2. Compact Growth Habit

  • Typically grows up to 2-3 feet tall, making it an excellent choice for smaller spaces or as a centerpiece in an indoor garden.

3. Adaptable Light Preferences

  • Thrives in bright, indirect light but can tolerate partial shade, making it suitable for various indoor and outdoor environments.

4. Low-Maintenance Care

  • Ideal for beginners, Hilo Beauty is relatively forgiving and doesn’t require the high humidity levels demanded by Alocasias.

Best For:

  • Plant enthusiasts seeking an easy-to-care-for, visually unique tropical plant.

Alocasia: Features and Benefits

1. Diverse Varieties

  • Alocasia plants come in a wide range of shapes, sizes, and colors, from compact varieties like Alocasia Polly to giant species like Alocasia Macrorrhiza.
  • Common traits include dramatic, arrow- or heart-shaped leaves with bold venation.

2. Tropical Aesthetic

  • Known for their bold and architectural foliage, Alocasias are a standout addition to any space.
  • Their glossy, textured leaves create a lush, sophisticated look.

3. Higher Humidity Requirements

  • Thrives in environments with high humidity (above 50-60%), making it ideal for tropical-themed indoor gardens or terrariums.

4. Versatile Size Options

  • Whether you need a compact plant for a tabletop or a large centerpiece for your patio, there’s an Alocasia to match your needs.

Best For:

  • Experienced plant owners or those willing to invest time in creating the perfect conditions for a high-maintenance, show-stopping plant.

Comparing Care Requirements

Care Aspect Hilo Beauty Caladium Alocasia
Light Bright, indirect light; tolerates partial shade. Bright, indirect light; some varieties require more light.
Watering Keep soil consistently moist but not soggy. Allow the top 1-2 inches of soil to dry between waterings.
Humidity Prefers moderate humidity but is adaptable. Requires high humidity (50-60%+).
Soil Well-draining soil enriched with organic matter. Well-draining soil; prefers a mix of peat, perlite, and orchid bark.
Temperature Thrives in warm conditions; avoid cold drafts. Sensitive to cold; requires consistent warmth.
Fertilization Monthly feeding during the growing season. Biweekly to monthly feeding with a balanced fertilizer.

Which Plant Should You Choose?

Choose Hilo Beauty Caladium If:

  1. You’re a beginner or prefer a low-maintenance plant.
  2. You want a compact, adaptable plant for smaller spaces.
  3. You love uniquely patterned foliage with a matte finish.
  4. You have a moderate humidity environment and prefer a plant less sensitive to environmental changes.

Choose Alocasia If:

  1. You’re an experienced gardener or willing to invest time in plant care.
  2. You want a bold, architectural statement piece with glossy foliage.
  3. You have the ability to provide high humidity and consistent warmth.
  4. You’re looking for variety and versatility, as Alocasias come in many shapes and sizes.

FAQs About Hilo Beauty Caladium and Alocasia

Q: Can Hilo Beauty and Alocasia grow together?

  • Yes, they can grow together if you provide similar light and soil conditions. However, Alocasia may require higher humidity levels.

Q: Are these plants pet-friendly?

  • No, both plants are toxic to pets and humans if ingested. Keep them out of reach of children and animals.

Q: Which plant grows faster?

  • Hilo Beauty typically grows faster and is less prone to dormancy compared to Alocasia, which may slow down or go dormant in cooler months.

Q: Can I grow these plants outdoors?

  • Yes, both can thrive outdoors in warm, tropical climates or during summer months in temperate regions. Bring them indoors when temperatures drop below 15°C (59°F).

Conclusion

Both the Hilo Beauty Caladium and Alocasia offer stunning foliage and a tropical vibe, but they cater to different preferences and care levels. Hilo Beauty is perfect for beginners or those seeking a low-maintenance, adaptable plant, while Alocasia is ideal for experienced gardeners who can provide the specific conditions it needs to thrive.

Whichever you choose, both plants will add a touch of exotic beauty to your collection, making them equally rewarding for plant enthusiasts!

Understanding Alocasia Plant Sweating: What You Need to Know

Alocasia plants, admired for their striking foliage and tropical appeal, have a fascinating characteristic that often surprises their owners—they “sweat.” While this phenomenon, called guttation, is entirely natural, it can raise questions and concerns, especially for new plant enthusiasts. This guide explains why Alocasia plants sweat, what it means for their health, and how to manage this unique occurrence.


What is Guttation?

Guttation is the process through which plants release excess water and nutrients in the form of droplets from specialized structures at the edges of their leaves, called hydathodes. Unlike dew, which forms from external condensation, guttation occurs internally and is directly related to the plant’s hydration levels and environment.


Why Do Alocasia Plants Sweat?

1. Excess Water in the Soil

  • When the soil is overly moist, the plant absorbs more water than it needs. To balance internal water pressure, the excess is expelled through guttation.

2. High Humidity Levels

  • Alocasia plants thrive in high humidity, but this environment can amplify guttation as the surrounding air slows water evaporation from the soil.

3. Nighttime Activity

  • Plants typically close their stomata (tiny pores on the leaves) at night, halting transpiration. However, water continues to be absorbed by the roots, leading to internal pressure and the release of water droplets through guttation.

4. Fertilizer Use

  • Fertilized soil can contribute to guttation as the plant expels excess nutrients along with water. This results in sticky droplets forming on the leaves.

Is Guttation a Sign of a Problem?

In most cases, guttation is harmless and does not indicate an issue with your plant. However, excessive or frequent guttation can be a sign of:

  1. Overwatering: Constantly soggy soil may lead to root rot.
  2. Poor Drainage: Insufficient drainage in the pot can trap water, creating stress on the roots.
  3. Fertilizer Overload: Excess nutrients in the soil can be expelled through guttation, potentially causing salt buildup.

How to Manage Guttation in Alocasia Plants

1. Adjust Your Watering Routine

  • Allow the top 1-2 inches of soil to dry out before watering.
  • Reduce watering frequency during winter dormancy, as Alocasias require less moisture during this period.

2. Improve Drainage

  • Ensure the pot has drainage holes to allow excess water to escape.
  • Use a well-draining soil mix that includes peat moss, perlite, and orchid bark.

3. Monitor Humidity

  • While Alocasias love humidity, keep it balanced. Aim for levels around 50-60%. Use a hygrometer to measure humidity and adjust with a humidifier or by placing the plant in a naturally humid room.

4. Fertilize Sparingly

  • Use a diluted, balanced fertilizer during the growing season, and avoid over-fertilizing. Reduce feeding during dormancy to prevent nutrient overload.

5. Wipe the Leaves

  • Gently wipe away droplets with a soft, damp cloth to prevent water stains or residue build-up on the leaves.

When to Worry About Guttation

Guttation is usually harmless, but if you notice additional symptoms, it may indicate underlying problems:

Symptom Possible Cause Solution
Persistent wilting Overwatering or root rot Check roots and adjust watering
Yellowing leaves Excess moisture or poor drainage Allow soil to dry, repot if needed
Sticky residue on leaves Fertilizer overload Reduce fertilization, flush soil

FAQs About Alocasia Sweating

Q: Are the droplets harmful?

  • No, the droplets are mostly water with trace amounts of nutrients. However, they may leave stains or attract pests if left on the leaves.

Q: Should I be concerned if my Alocasia sweats every day?

  • Frequent sweating may indicate overwatering or poor drainage. Adjust care practices accordingly.

Q: Can guttation harm the plant?

  • Guttation itself does not harm the plant, but it can signal potential issues like excessive moisture or over-fertilization that require attention.

Q: Does guttation mean my plant is overwatered?

  • Not necessarily. Guttation can occur even in well-watered plants, especially in high-humidity environments.

Fun Fact About Guttation

Guttation is not unique to Alocasias—it also occurs in other plants like Monstera, peace lilies, and grasses. However, Alocasia’s large, dramatic leaves make the phenomenon more noticeable, adding to its allure as a tropical plant.


Conclusion

Sweating, or guttation, is a natural and fascinating aspect of Alocasia care. While it’s generally harmless, understanding its causes and managing environmental factors can ensure your plant remains healthy and happy. By adjusting your watering routine, monitoring humidity, and providing proper drainage, you can strike the perfect balance for your Alocasia to thrive.While this phenomenon, called guttation, is entirely natural, it can raise questions and concerns, especially for new plant enthusiasts. This guide explains why Alocasia plants sweat, what it means for their health, and how to manage this unique occurrence.

Embrace this unique characteristic of Alocasia plants and enjoy their beauty as they bring a tropical vibe to your home! The Alocasia Deliciosa is a unique and visually striking plant that brings a tropical vibe to any space. With its bold foliage and manageable care requirements, it’s an excellent choice for plant collectors and gardening enthusiasts alike. Whether used as an indoor statement piece or an outdoor centerpiece, this exotic beauty is sure to elevate your plant collection.

Alocasia Deliciosa: A Unique Variety for Plant Lovers


The Alocasia Deliciosa is a captivating tropical plant known for its bold, unique foliage and striking presence. As a rare and exotic variety, it has become a favorite among plant collectors and gardening enthusiasts looking to add a touch of the extraordinary to their indoor or outdoor spaces. This guide introduces the Alocasia Deliciosa, its distinctive features, and care requirements to help you make the most of this stunning plant.


Why Choose Alocasia Deliciosa?

1. Unique Foliage

  • The Alocasia Deliciosa is renowned for its large, paddle-shaped leaves with a slightly rippled texture, resembling the classic “Elephant Ear” aesthetic.
  • Its deep green leaves have prominent veining, creating a bold, architectural look.

2. Exotic Appeal

  • Native to tropical regions of Southeast Asia, this plant brings a lush, rainforest vibe to your home or garden.

3. Statement Plant

  • With its impressive size and dramatic foliage, Alocasia Deliciosa is perfect for making a statement in any space.

4. Versatility

  • Suitable for both indoor and outdoor growth, it adapts well to various environments when provided with proper care.

Features of Alocasia Deliciosa

Feature Details
Leaf Shape Broad, slightly wavy paddle-shaped leaves
Size Grows up to 3-5 feet indoors; larger outdoors
Growth Habit Upright and spreading, creating a bushy appearance
Light Preference Bright, indirect sunlight
Toxicity Toxic to pets and humans if ingested

Caring for Alocasia Deliciosa

Proper care ensures your Alocasia Deliciosa thrives and maintains its stunning appearance.

1. Light Requirements

  • Optimal: Bright, indirect sunlight.
  • Avoid: Direct sunlight, which can scorch the leaves, and low-light conditions, which may stunt growth.
  • Tip: If grown outdoors, place it in partial shade or under a canopy to mimic its natural habitat.

2. Watering Needs

  • Keep the soil consistently moist but not soggy.
  • Water when the top 1-2 inches of soil feel dry.
  • Reduce watering during winter when the plant enters dormancy.

3. Humidity

  • Alocasia Deliciosa thrives in high humidity levels (above 60%).
  • How to Maintain Humidity:
    • Use a humidifier.
    • Mist the leaves regularly.
    • Group it with other plants to create a humid microclimate.

4. Temperature Preferences

  • Prefers warm temperatures between 18–30°C (65–85°F).
  • Protect it from cold drafts, air conditioning vents, or sudden temperature changes.

5. Soil and Potting

  • Use a well-draining potting mix with organic matter. A mix of peat moss, perlite, and orchid bark works well.
  • Ensure the pot has drainage holes to prevent waterlogging.

6. Fertilization

  • Feed every 4-6 weeks during the growing season (spring and summer) with a balanced liquid fertilizer.
  • Avoid over-fertilizing, as this can cause salt buildup and harm the roots.

Common Challenges and Solutions

1. Yellowing Leaves

  • Cause: Overwatering or poor drainage.
  • Solution: Adjust your watering schedule and ensure the pot has adequate drainage.

2. Browning Leaf Edges

  • Cause: Low humidity or inconsistent watering.
  • Solution: Increase humidity levels and maintain consistent soil moisture.

3. Pest Infestations

  • Common Pests: Spider mites, aphids, and mealybugs.
  • Solution: Treat with neem oil or insecticidal soap and inspect the plant regularly for signs of pests.

4. Slow Growth

  • Cause: Insufficient light or lack of nutrients.
  • Solution: Move the plant to a brighter spot and fertilize during the growing season.

Decorating with Alocasia Deliciosa

1. Indoor Elegance

  • Use the Alocasia Deliciosa as a statement piece in living rooms, offices, or entryways. Its bold foliage complements modern or minimalist interiors.

2. Outdoor Landscaping

  • In warmer climates, it can be planted outdoors as a focal point in tropical or shaded gardens. Pair it with ferns, calatheas, or philodendrons for a layered, lush look.

3. Potted Versatility

  • Place it in a large, decorative pot to elevate its presence, whether indoors or on a patio.

FAQs About Alocasia Deliciosa

Q: How often should I water my Alocasia Deliciosa?

  • Water when the top 1-2 inches of soil feel dry. Frequency depends on temperature and humidity levels.

Q: Can I grow Alocasia Deliciosa outdoors?

  • Yes, it thrives outdoors in tropical or subtropical climates. In colder regions, it can be grown as a container plant and brought indoors during winter.

Q: Is Alocasia Deliciosa toxic?

  • Yes, it is toxic to pets and humans if ingested. Keep it out of reach of children and animals.

Q: Why are my Alocasia’s leaves drooping?

  • Drooping leaves can result from overwatering, underwatering, or environmental stress. Adjust care routines accordingly.

Conclusion

The Alocasia Deliciosa is a unique and visually striking plant that brings a tropical vibe to any space. With its bold foliage and manageable care requirements, it’s an excellent choice for plant collectors and gardening enthusiasts alike. Whether used as an indoor statement piece or an outdoor centerpiece, this exotic beauty is sure to elevate your plant collection. The Alocasia Deliciosa is a captivating tropical plant known for its bold, unique foliage and striking presence. As a rare and exotic variety, it has become a favorite among plant collectors and gardening enthusiasts looking to add a touch of the extraordinary to their indoor or outdoor spaces. This guide introduces the Alocasia Deliciosa, its distinctive features, and care requirements to help you make the most of this stunning plant.

Add the Alocasia Deliciosa to your home or garden today and enjoy the lush elegance it brings to your space!

Caring for Alocasia Infernal: Tips for a Lush Indoor Plant


The Alocasia Infernal, an exotic and striking tropical plant, is a prized addition to any indoor plant collection. Known for its dramatic foliage, rich dark tones, and unique growth habits, it brings a touch of sophistication to any space. However, like most Alocasia varieties, the Infernal requires specific care to thrive. This guide provides essential tips to help you maintain your Alocasia Infernal and enjoy its lush, healthy growth.


Features of Alocasia Infernal

1. Dark, Striking Foliage

  • The Alocasia Infernal boasts deep green to blackish leaves with a velvety texture and prominent veining, creating a bold and dramatic appearance.

2. Compact Growth Habit

  • Reaching up to 2-3 feet in height, this plant is suitable for medium-sized spaces and makes an excellent focal point in your indoor garden.

3. Tropical Appeal

  • Its exotic look and rainforest origins make it a standout choice for plant enthusiasts who love unique foliage.

Ideal Conditions for Alocasia Infernal

To ensure your Alocasia Infernal thrives, it’s essential to mimic its natural tropical habitat.

1. Light Requirements

  • Optimal: Bright, indirect sunlight.
  • Avoid: Direct sunlight, which can scorch its delicate leaves, and low-light conditions, which may result in slower growth and dull foliage.
  • Tip: Place the plant near an east-facing window or use a sheer curtain to diffuse strong light.

2. Watering Needs

  • Keep the soil consistently moist but not soggy. Allow the top inch of soil to dry out slightly between waterings.
  • Water less frequently during winter when the plant enters a dormancy phase.

3. Humidity Levels

  • Alocasia Infernal thrives in high humidity, ideally above 60%.
  • How to Increase Humidity:
    • Use a humidifier.
    • Place the plant near a pebble tray filled with water.
    • Mist the leaves regularly, especially in dry indoor environments.

4. Temperature Preferences

  • Prefers warm conditions between 18–30°C (65–85°F).
  • Protect the plant from cold drafts, sudden temperature changes, or air conditioning vents.

5. Soil and Potting

  • Use a well-draining potting mix that retains some moisture. A mix of peat moss, perlite, and orchid bark works well.
  • Ensure the pot has drainage holes to prevent waterlogging.

6. Fertilization

  • Feed the plant every 4-6 weeks during the growing season (spring and summer) with a diluted liquid fertilizer.
  • Avoid over-fertilizing, as this can lead to salt buildup and damage the roots.

Common Problems and Solutions

1. Yellowing Leaves

  • Cause: Overwatering or underwatering.
  • Solution: Adjust your watering schedule to maintain consistent soil moisture.

2. Browning Leaf Edges

  • Cause: Low humidity or inconsistent watering.
  • Solution: Increase humidity levels and ensure regular, even watering.

3. Drooping Leaves

  • Cause: Environmental stress, overwatering, or underwatering.
  • Solution: Evaluate the plant’s light, water, and humidity conditions and make necessary adjustments.

4. Pests

  • Common Pests: Spider mites, aphids, and mealybugs.
  • Solution: Treat infestations promptly with neem oil or insecticidal soap and inspect the plant regularly for signs of pests.

How to Encourage Lush Growth

  1. Provide Consistent Care: Maintain steady light, humidity, and watering routines.
  2. Repot When Necessary: Repot every 1-2 years or when the plant becomes root-bound. Use a pot slightly larger than the current one to avoid overwatering risks.
  3. Prune Damaged Leaves: Regularly remove yellowing or damaged leaves to direct energy toward new growth.
  4. Clean the Leaves: Wipe the foliage with a damp cloth to remove dust and enhance its velvety appearance.

Decorating with Alocasia Infernal

1. As a Focal Point

  • Use the Alocasia Infernal as a statement piece in living rooms, offices, or entryways. Its bold foliage adds a dramatic flair to any space.

2. Tropical Plant Combos

  • Pair it with other tropical plants like Monstera or Philodendron for a lush, layered indoor garden.

3. Modern Decor

  • Place it in a sleek, neutral pot to complement minimalist or contemporary interiors.

FAQs About Alocasia Infernal Care

Q: How often should I water my Alocasia Infernal?

  • Water when the top inch of soil feels dry. Frequency will depend on the plant’s environment, but avoid letting the soil dry out completely.

Q: Can Alocasia Infernal tolerate low light?

  • While it can survive in low light, it will not thrive. Bright, indirect light is essential for healthy growth.

Q: How do I increase humidity for my plant?

  • Use a humidifier, mist the leaves, or place the pot on a pebble tray filled with water.

Q: Should I fertilize during winter?

  • No, reduce or stop fertilizing during the plant’s dormancy period in winter.

Conclusion

The Alocasia Infernal is a stunning tropical plant that thrives with the right care and attention. By providing bright, indirect light, consistent humidity, and well-balanced watering, you can ensure its lush foliage remains vibrant and healthy. Whether you’re a seasoned plant enthusiast or a new gardener, the Infernal makes a striking addition to any indoor garden.With so many beautiful Alocasia varieties to choose from, there’s a perfect match for every plant enthusiast. Whether you’re drawn to bold, oversized leaves or compact, velvety foliage, Alocasias bring a touch of the tropics to any home or garden. Use this guide to explore the options and find the one that best suits your style and space.

Add the Alocasia Infernal to your collection today and enjoy its exotic beauty and dramatic presence in your home!

Types of Alocasia with Pictures: Find Your Perfect Match


Alocasia plants, with their stunning foliage and exotic charm, are a favorite among plant lovers. With over 70 species and numerous hybrids, there’s an Alocasia for every style and space. From bold, giant-leaved varieties to compact, intricately veined options, this guide highlights some of the most popular and unique Alocasia types. Each entry includes a description and image to help you find your perfect match.


1. Alocasia Macrorrhiza (Giant Taro)

Features:

  • Massive, glossy green leaves that can grow up to 3 feet long.
  • Upright growth habit, making it a dramatic choice for gardens or large indoor spaces.
  • Can reach heights of 6-10 feet outdoors in tropical climates.

Best For:

  • Outdoor landscaping or creating a bold indoor statement.

2. Alocasia Polly (African Mask Plant)

Features:

  • Compact size with dark green, arrow-shaped leaves featuring prominent white veins.
  • A favorite for indoor gardening due to its manageable size (1-2 feet tall).

Best For:

  • Beginners and small indoor spaces.

3. Alocasia Zebrina

Features:

  • Distinctive zebra-like patterned stems paired with elongated green leaves.
  • Striking and unusual, perfect for collectors seeking a unique addition.

Best For:

  • Modern interiors or as a conversation piece.

4. Alocasia Regal Shield

Features:

  • Dark green, almost black leaves with a velvety texture and subtle bronze underside.
  • Grows up to 3-4 feet tall, adding elegance to any indoor space.

Best For:

  • Those who love dramatic, moody foliage.

5. Alocasia Frydek (Green Velvet Alocasia)

Features:

  • Velvety deep green leaves with sharp, white veins.
  • Compact growth habit, making it suitable for tabletops and shelves.

Best For:

  • Small spaces and collectors of rare, luxurious plants.

6. Alocasia Silver Dragon

Features:

  • Silvery, metallic leaves with dark green veins, resembling dragon scales.
  • Compact size and slow growth, ideal for terrariums or small indoor gardens.

Best For:

  • Rare plant enthusiasts and low-light indoor setups.

7. Alocasia Amazonica

Features:

  • Hybrid variety with striking, glossy green leaves and white venation.
  • Grows up to 2-3 feet tall, offering a lush, tropical look.

Best For:

  • Indoor gardeners seeking a classic, eye-catching Alocasia.

8. Alocasia Dragon Scale

Features:

  • Thick, textured leaves with a scaly appearance, ranging from green to silvery hues.
  • Compact and manageable, making it a favorite for tabletops and shelves.

Best For:

  • Those who love bold, architectural plants.

9. Alocasia Portora

Features:

  • Large, ruffled-edge leaves that can grow up to 4 feet long.
  • Upright growth habit, reaching up to 6-8 feet tall outdoors.

Best For:

  • Large indoor spaces or tropical outdoor gardens.

10. Alocasia Cuprea (Mirror Plant)

Features:

  • Glossy, metallic leaves with a reddish-bronze or green hue.
  • Compact and slow-growing, ideal for unique, decorative setups.

Best For:

  • Indoor gardeners who appreciate rare and reflective foliage.

11. Alocasia Micholitziana (Green Velvet Alocasia)

Features:

  • Dark green, velvety leaves with prominent white veins.
  • Upright and compact, perfect for medium-sized indoor spaces.

Best For:

  • Those who want a sophisticated, lush look.

12. Alocasia Pink Dragon

Features:

  • Vibrant pink stems paired with glossy green leaves.
  • Compact and striking, adding a pop of color to any collection.

Best For:

  • Collectors and those who love unique stem colors.

13. Alocasia Black Velvet

Features:

  • Deep black, velvety leaves with white veins, creating a bold contrast.
  • Small and slow-growing, ideal for terrariums or small indoor gardens.

Best For:

  • Minimalist decor and rare plant collections.

14. Alocasia Tiny Dancer

Features:

  • Upright, slender stems topped with small, rounded green leaves that appear to “dance.”
  • Compact and whimsical, perfect for tabletops or shelves.

Best For:

  • Indoor gardeners seeking a playful, unique plant.

Choosing the Right Alocasia for Your Space

Feature Large Spaces Small Spaces Rare Varieties Easy Care
Recommended Types Macrorrhiza, Portora Frydek, Pink Dragon Silver Dragon, Black Velvet Polly, Zebrina

Care Tips for All Alocasias

  1. Light: Bright, indirect sunlight is best. Avoid direct sun, which can scorch leaves.
  2. Water: Keep the soil moist but well-draining. Allow the top inch of soil to dry slightly between waterings.
  3. Humidity: High humidity (50-60%) is ideal. Use a humidifier or mist the plant regularly.
  4. Fertilization: Feed monthly during the growing season with a balanced liquid fertilizer.

Conclusion

With so many beautiful Alocasia varieties to choose from, there’s a perfect match for every plant enthusiast. Whether you’re drawn to bold, oversized leaves or compact, velvety foliage, Alocasias bring a touch of the tropics to any home or garden. Use this guide to explore the options and find the one that best suits your style and space.

Providing the right kind of light is essential for keeping your Alocasia healthy and thriving. These tropical plants flourish in bright, indirect sunlight, mimicking their natural rainforest habitat. Whether you’re working with natural light, grow lights, or a combination of both, understanding and adjusting to your plant’s needs will ensure it rewards you with stunning, vibrant foliage.

The Yellow Tail Alocasia is a rare and stunning tropical plant that adds vibrant color and exotic beauty to any space. While it requires specific care, its bold yellow stems and glossy green leaves make it a rewarding addition to your collection. By following the tips in this guide, you’ll enjoy a thriving, healthy Yellow Tail Alocasia that will be the envy of plant enthusiasts everywhere.

Add this unique variety to your collection today and elevate your indoor or outdoor garden with its striking appeal!

Set your Alocasia up for success by mastering its lighting requirements, and watch it become the centerpiece of your indoor or outdoor space!


Exit mobile version